Sunday 24 March 2024

Error SQL1105 "Can't allocate space for object..." - SAP ASE

One of following errors can be observed:

Error 1105 Can't allocate space for object '<object_name>' in database 'saptools' because 'default' segment is full/has no free extents

Error 1105 Can't allocate space for object 'syslogs' in database 'saptools' because 'logsegment' is full/has no free extents

Error SQL1105 "Can't allocate space for object..." "

Identify the device which having the size issue by following options.

Option 1 :- DB13 ---> Database ---> Space ---> Devices

Option 2 :- sp_helpdb

Once the device has identified then based on the space availability on you server you can size the device or create new device.

If the error message is reported on "default segment", then add the new space on device <data_device_name>

Resize Device

use master
go
disk resize name=<existing_data_device_name>, size = '<size in GB>M' 
go
alter database <dbname> on <existing_data_device_name> = '<size in GB>M' 
go

If the error message is reported on "log segment" then add the new space

use master
go  
disk resize name = "<log_device_name>", size = "<size>M"
go  
alter database <dbname> log on <log_device_name> = "<size>M"
go

Wednesday 20 March 2024

How to disable Transaction log on Sybase ASE

During Execution phase of an upgrade, when you ae performing archiving activities on Development or Quality system but you don't have enough space for keeping transaction data or because of some specific reason if you want to disable the trans log on your Sybase system you can follow this option.

This is not recommended on Production systems because as the transaction log is used for performing a complete restoration of data. 

1. Log in on your server with user SYBSID 

2. Launch with a command line tool to connect to ASE database

isql -Usapsa -P< password > -S< SID > -X

3. On the SQL interface, enter the statements to change log mode

1> use master

2> go

1> sp_dboption <SID>, 'trunc',true

2> go


Database option 'trunc. log on chkpt.' turned OFF for database ''.
Running CHECKPOINT on database '' for option 'trunc. log on chkpt.' to take
effect.
(return status = 0)


1> checkpoint

2> go

Use below commands to change the Setting "true" to "false".

1> use master

2> go

1> sp_dboption <SID> , 'trunc',false

2> go


Database option 'trunc. log on chkpt.' turned OFF for database ''.
Running CHECKPOINT on database '' for option 'trunc. log on chkpt.' to take
effect.
(return status = 0)


1> checkpoint

2> go

Monday 23 May 2022

How to 'lock' and 'unlock' 'sa' login - SAP ASE

Following errors  facing while login to isql in sybase DB with 'sa' account .

*  unable to connect as user 'sa'

*  ct_connect(): protocol specific layer: external error: The attempt to connect to the server failed.

*  isql -Usa -SSID -X
   Msg 4002, Level 14, State 1:
   Server 'SID'
   :Login failed.
   CT-LIBRARY error
:

For security reasons 'sa' login is locked for sybase ASE business suits and BW , hould only be used for maintenance if advised by support.
  • Never 'unlock' 'sa' login for normal activities instead use 'sapsa' account for normal activities including backups.
  • Only for maintenance if you need to use 'sa' login, you will need to first unlock it.
Syntax  for sa unlock :-
isql -Usapsso -P<password> -S<SID> -X
> sp_locklogin 'sa', 'unlock'
> go

Remember to 'lock' 'sa' login once the maintenance is complete

Syntax for lock sa account :-
> sp_locklogin 'sa', 'lock'
> go

Wednesday 18 May 2022

Start & Stop Wily Introscope

Login to the operating system. 

go to location - /usr/sap/ccms/apmintroscope/bin

Status Check -
./EMctrl.sh status

Wily introscope status

Start Wily Introscope -
./EMctrl.sh start

Stop Wily Introscope -
./EMctrl.sh stop

If stop command not working then kill the running wily introscope process.

kill -9 PID
PID - you will get from command - ./EMctrl.sh status

Also Read,

Thursday 12 May 2022

Wily Introscope Upgrade for Solution Manager (Linux)

To upgrade the existing Wily Introscope in your solution manager system. Please follow below steps,

Download the latest Wily Introscope file from SAP software download center,

https://launchpad.support.sap.com/#/softwarecenter
---> SUPPORT PACKAGES & PATCHES 
---> By Alphabetical Index (A-Z)
---> S
---> SAP SOLUTION MANAGER
---> SAP SOLUTION MANAGER 7.2
---> WILY INTROSCOPE

Download Wily Introscope ENTPR MGM and Wily Introscope ENTPR MGMT Modules lates version.

Step 1 :-
Check current version of Wily Introscope running on the System,
Goto locaton - /usr/sap/ccms/apmintroscope/logs

Open file IntroscopeEnterpriseManager.log,
Search following entry in the file, 
Introscope Enterprise Manager Release

Step 2 :-
Create a temp directory to keep he downloaded wily introscope files,
temporary directory name using here is - wily_temp

cd /usr/sap/ccms
mkdir wily_temp
chmod 777 wily_temp
chown sidadm:sapsys wily_temp

Step 3:-
Copy Downloaded Wily Introscope  files to Solution Manager Server,
Location - /usr/sap/ccms/wily_temp

Step 4:-
Check status of Wily Introscope on the system,

cd /usr/sap/ccms/apmintroscope/bin
./EMCtrl.sh status

Confirm Wily is running on the system.

Step 5:-
Stop Wily inroscope using below command,

./EMCtrl.sh stop

Check again Wily introscope status after stop command executed, confirm wily has been stopped.

./EMCtrl.sh status

Step 6:-
Move current Wily introscope installed directory to as backup,

cd /usr/sap/ccms
mv apmintroscope apmintroscope_bkp

Step 7:-
Perform the new installation (Upgrade)
unzip the Wily introscope files,

cd /usr/sap/ccms/wily_temp
unzip WILYISEM00P_x-*.ZIP

Edit ca-eula.txt for installation,

chmod +x introscope10.7.0.307linuxAMD64SAP.bin
./introscope10.7.0.307linuxAMD64SAP.bin

Step 8:-
Extract wily management modules on top of New Wily Introscope installed,

cd /usr/sap/ccms/wily_temp
unzip -o WILYISMM00P_10-7000xxx.ZIP -d  /usr/sap/ccms/apmintroscope

Step 9:-
Transfer files from old installation to new installation,

cd  /usr/sap/ccms/apmintroscope

mkdir data

cp -R /usr/sap/ccms/apmintroscope apmintroscope_202205_bkp/data /usr/sap/ccms/apmintroscope/data

mkdir traces

cp -R /usr/sap/ccms/apmintroscope apmintroscope_202205_bkp/traces /usr/sap/ccms/apmintroscope/traces

Step 10:-
Transfer files from old installation to new installation

cp -f /usr/sap/ccms/apmintroscope_202205_bkp/Introscope_Enterprise_Manager.lax /usr/sap/ccms/apmintroscope/Introscope_Enterprise_Manager.lax

cp /usr/sap/ccms/apmintroscope_202205_bkp/config/users.xml /usr/sap/ccms/apmintroscope/config/users.xml

cp /usr/sap/ccms/apmintroscope_202205_bkp/config/users-sap.xml /usr/sap/ccms/apmintroscope/config/users-sap.xml

cp /usr/sap/ccms/apmintroscope_202205_bkp/config/domains.xml /usr/sap/ccms/apmintroscope/config/domains.xml

cp /usr/sap/ccms/apmintroscope_202205_bkp/config/loadbalancing.xml /usr/sap/ccms/apmintroscope/config/loadbalancing.xml

cp /usr/sap/ccms/apmintroscope_202205_bkp/config/apm-events-thresholds-config.xml /usr/sap/ccms/apmintroscope/config/apm-events-thresholds-config.xml

cp /usr/sap/ccms/apmintroscope_202205_bkp/config/agentclusters.xml /usr/sap/ccms/apmintroscope/config/agentclusters.xml

cp /usr/sap/ccms/apmintroscope_202205_bkp/config/em-jetty-config.xml /usr/sap/ccms/apmintroscope/config/em-jetty-config.xml 

cp /usr/sap/ccms/apmintroscope_202205_bkp/sap/*.e2emai.properties /usr/sap/ccms/apmintroscope/sap/ 

Step 11:-
Copy old Management Module configuration missing files to new /usr/sap/ccms/apmintroscope/config/modules location

cp /usr/sap/ccms/apmintroscope_202205_bkp/config/modules/ChangeDetectorManagementModule.jar /usr/sap/ccms/apmintroscope/config/modules

cp /usr/sap/ccms/apmintroscope_202205_bkp/config/modules/DifferentialAnalysisMM.jar /usr/sap/ccms/apmintroscope/config/modules

cp /usr/sap/ccms/apmintroscope_202205_bkp/config/modules/SPM_ManagementModule.jar /usr/sap/ccms/apmintroscope/config/modules

cp /usr/sap/ccms/apmintroscope_202205_bkp/config/modules/TriageMapConfigurationsManagementModule.jar /usr/sap/ccms/apmintroscope/config/modules

Step 12:-
Start new Wily Introscope,

cd /usr/sap/ccms/apmintroscope/bin
./EMCtrl.sh start

Check again Wily EM status after start command executed
./EMCtrl.sh status

Step 13:-
Check version of Wily Introscope after upgrade,
Goto locaton - /usr/sap/ccms/apmintroscope/logs

Open file IntroscopeEnterpriseManager.log,
Search following entry in the file, 
Introscope Enterprise Manager Release

Monday 25 April 2022

STMS configuration in single system with virtual system

You have 1 SAP system and you want to configure 3 or 2 system landscape in the STMS. 
Login to the 000 client with DDIC user and execute transaction code STMS. You will be prompt a box which asking to configure Transport Domain. Fill in the description and save. Now your system will be the domain controller.STMS using virtual systems
Set password,STMS using virtual systems
Domain  controller has configured now, 
click on 'System Overview' option.
STMS using virtual systems
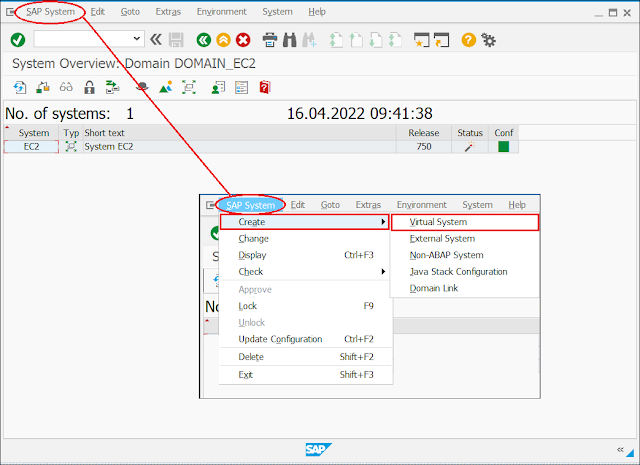
On the 'System Overview' screen,
Select SAP Systems ---> Create ---> Virtual Systems
STMS using virtual systems

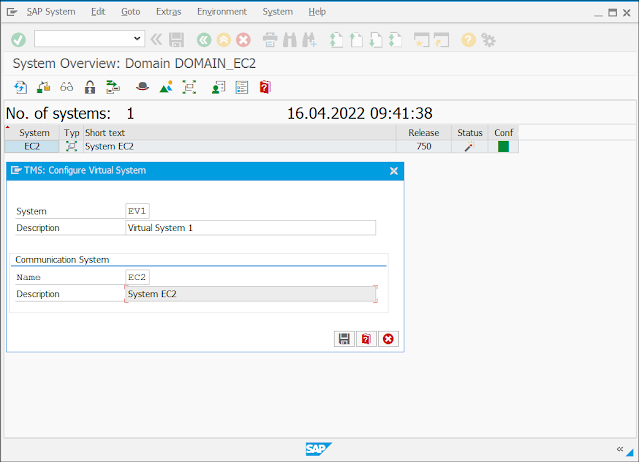
Enter first Virtual system ID and description and save it 
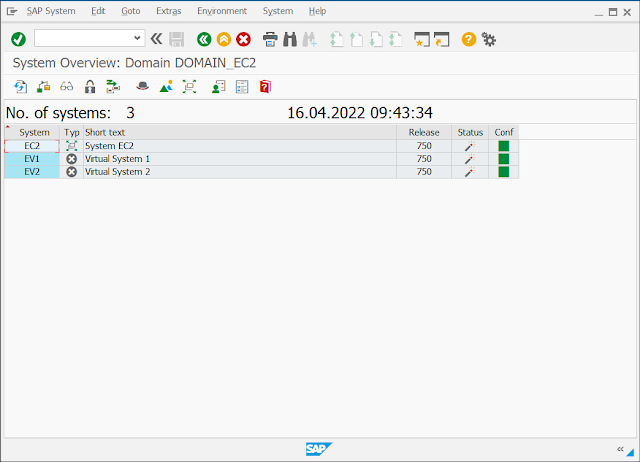
STMS using virtual systemsIf you want to configure 3 system landscape then execute again the above steps and give second virtual system ID & description.You could see the 3 system details in System overview screen after your configuration,STMS using virtual systems
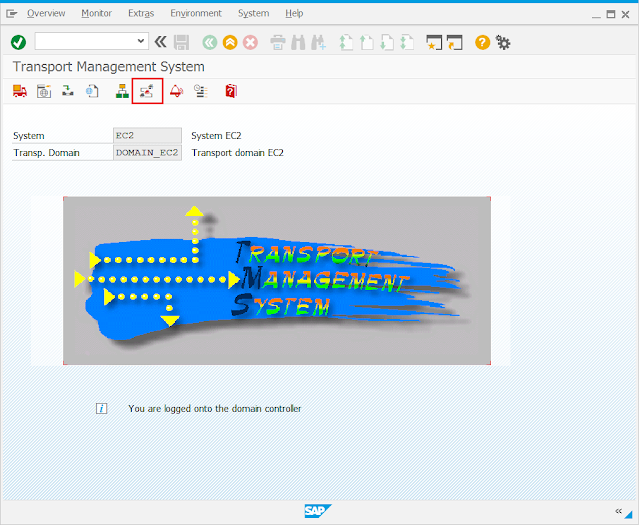
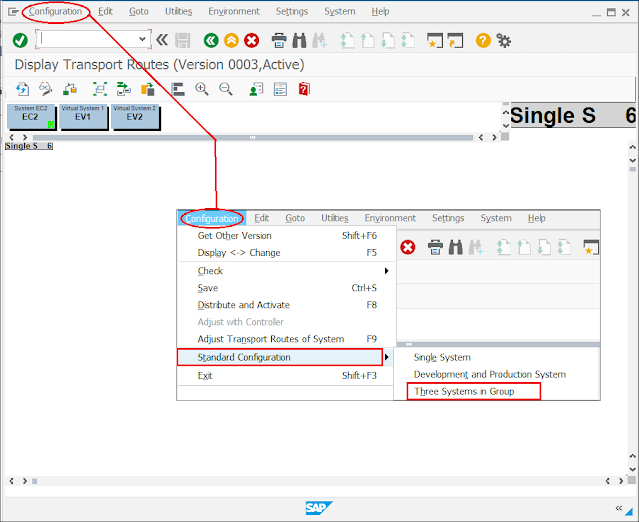
Go back to STMS screen and click on 'Transport Rout' option,
STMS using virtual systems

You can see the systems in the opened screen,
Select Configuration ---> Standard Configuration --->Three System in Group

If you have only 2 systems, the select option 'development and Production System'
STMS using virtual systems

Choose Development, Quality and Production systems accordingly,
STMS using virtual systems

Now the systems will display with transport routs,
STMS using virtual systems

Cross check the configuration is correct,
Then click on 'Distribute and Activate' option.
STMS using virtual systems

Save the configuration.

Also read,

Tuesday 12 April 2022

Delete SAP Client from OS Level

Instead of delete SAP client from SAP application level we can do the same from OS level as well. It is bit faster than application level. This may useful at sometime.

1. Login to application server OS level with SIDADM User

2. Go to location /usr/sap/trans/bin directory

3. Create a file with  .CTL format which includes following content,

client=<Client Number>
select  
clientremove
Example :-
clientremove
client=300
select  *

SAP Client delete from OS level

File Name Format Example - Client_<SID><CLNT NO>_Delete.CLT
For our example , System ID = ECP and CLIENT = 300 , so the file should be look like ;
Client_ECP600_Delete.CLT
4. Let’s realized the operation via R3trans command
R3trans -w <Log file name> <Script name>
Example :-
R3trans -w Client_ECP600_LOG.log Client_SID600_Delete.ctl

SAP Client delete from OS level

Wait until it complete,

SAP Client delete from OS level
5. After successful completion of the execution, check the log file for more details.
Log File - Client_ECP600_LOG.log 
Login to SAP system & delete Client entries from table T000 or from SCC4 

Also Read,

How to delete client in SAP system


Tuesday 29 March 2022

Mass user deletion in SAP

We know mass user activities in SAP we are able to do using SU10 transaction code.

But if we want to delete 1000 users at a single time it is difficult to enter the 1000 user name or upload from the clip board. In that situation we can use below option,

Got to SU10 T-codeSU10

Choose multiple selection option, 
SU10

We have different option here,
We can find the users with user group, profile, roles, etc..

We are using 'Users by Roles' option.
Enter Role name in Role tab and change the maximum number of hits 
SU10

Select the users & Click on the 'Tick' option
SU10

Confirm the user list and click on Delete option,
SU10

Confirm 'Yes' to start the deletion activity
SU10

Depends on the number of users the deletion time take,
After successful deletion of users the output should like below.

Same steps we can use for Mass user lock, unlock options as well.

Also Read,
SAP Secuity

Sunday 5 December 2021

SAPOSCOL - Operating System Collector

Ø  What is SAPOSCOL ?

SAPOSCOL is a stand-alone program that runs in the operating system background. It runs independently of SAP instances exactly once per monitored host. collects data about operating system resources like,

  • Usage of virtual

  • Usage physical memory

  • CPU Utilization

  • Utilization of physical disks 

  • Utilization of file systems

  • Resource usage of running processes

Ø  How it works ?
  • SAPOSCOL runs exactly once on each host.

  • SAPOSCOL runs independently of the SAP system.

By default, SAPOSCOL collects the current data every ten seconds and records it, and records the hourly averages for the last 24 hours, The data is stored in shared memory.  This data will be fetched by background job “SAP_COLLECTOR_FOR_PERFORMANCE” and writes it to the MONI performance database table.

Ø  How to check the SAPOSCOL data ?

At SAP level you can view the information collected by SAPOSCOL using tcodes/transactions ST06, OS06 & OS07.

Ø  SAPOSCOL Administration from OS Level

Login to Server as SIDADM user

SAPOSCOL Stop
saposcol -k

SAPOSCOL Start
saposcol -l

Check SAPOSCOL status
saposcol -s

Ø  SAPOSCOL administration from GUI

  • Execute transaction OS07N
  • Select from the left panel (Marked as 1)
  • Expand 'Additional functions' and choose 'Administrator SAPOSCOL'       (Marked as 2)
  • Select the command "Start, Stop or Status" from top menu (Marked as 3)
SAPOSCOL

Also Read,

Thanks for reading, Please share your valuable feedback